Generative AI is the new hot stuff. And its more easy than you presume. No need to spend billions on the hyperscalers profits. For the sake of ease as a first approach I will start here with a Linux based nevertheless Windows constellation.
This is a fundamental good approach because this relieves you from data privacy issues and helps with much more control over your private data. Predominantly without loss of quality because some of the included models come from large organizations with substantial funds. And there is not even a lack of performance or service integrity:

You may integrate large language models, image generation (never write an article or give an talk on AI without kittens – these up there are NOT real) and even integrate this as chatbots in your personal tools.
But to start:
Install a general available Linux platform – focus here on Debian (Ubuntu should work just as well) and install it in your local WSL – Windows Subsytem on Linux Environment. Most of this would apply to server installations, but I would spend some more effort to make this nice and shiny – and this should be an easy to use quick approach.
WSL Installation
Ensure Windows Terminal app is installed on your Windows PC – This is not CMD !.
Beyond that the installation of an local LLM is encouraged because it is easy to interact with windows desktop tools, which then may provide an network independent and customized chatbot.
Enter Terminal on Power Shell and enter
wsl --install -d DebianAdditional distributions might be available and may be retrieved likewise. An overview you get is with :
PS C:\Users\f.benke> wsl --list --online

I prefer then to set the default version of the started WSL container to the application specific one. You may install more different Linuxes in this environment
wsl --set-default DebianNext step then should be
Customization of Debian
Within your Debian environment you are supposed to install some packages and tools to enable this environment. To prepare your installation, perform:
sudo apt-get install -y curl wget npm git libgl1 libjpgalleg4.4 tcl-xpa build-essential libssl-dev zlib1g-dev libbz2-dev libreadline-dev libsqlite3-dev wget curl llvm libncurses5-dev libncursesw5-dev xz-utils libffi-dev liblzma-dev bcMake sure the Nvidia Tools are installed. You may check with
nvidia-smi

A command that actually shows quite more that you later may contignously observe with a
watch -n 0.5 nvidia-smito contiguously observe the performance of your system. Since workloads shift between CPU and GPU and between shaders and tensor tasks I as well recommend the installation of a top and tmux for additional convenient behavior monitoring on the command line.
sudo apt-get install htop tmux vim nanoWithin WSL the Debian container on top comes not with Python v.3 as default where you have to add this, as well as it is sparse on some other currently usual tools. I even add nano since WSL and copy paste and buffering is sometimes special.
sudo apt-get install python3 python3-opensslSince we need docker we have to prepare docker and first add dockers gpg keys to the toolchain.
sudo curl -fsSL https://download.docker.com/linux/debian/gpg -o /etc/apt/keyrings/docker.asc

chmod a+r /etc/apt/keyrings/docker.asc
After that the apt sources need to be extended according to your Debian version – most recently bookworm
echo "deb [arch=$(dpkg --print-architecture) signed-by=/etc/apt/keyrings/docker.asc] https://download.docker.com/linux/debian $(. /etc/os-release && echo "$VERSION_CODENAME") stable" | sudo tee /etc/apt/sources.list.d/docker.list > /dev/nullTo then install all the needed docker components please run
sudo apt-get install docker-ce docker-ce-cli containerd.io docker-buildx-plugin docker-compose-pluginThen either do
sudo systemctl start dockeror
/etc/init.d/docker startto start the backend service and check with an
docker runInstalling and Running Ollama
The Ollama installation basically is provided by https://ollama.com/ where you might find as well the available libraries of language models under https://ollama.com/library and some more background information.
sudo curl -fsSL https://ollama.com/install.sh | shHereby Ollama will be installed system wide in /usr/bin, the ollama user will be added. On systemd enabled services, the ollama.service will be configured and enabled. On rc script based systems you may have to add manually runlevel based rc scripts in /etc/init.d/ which is unfortunately within WSL the case – and where an upgrade currently is not supported by Microsoft.
The installation should report on whether an installed GPU is detected or not.
After that you may install already your first LLM – recommended first choice to be competitive is llama3 which you initiate with
ollama pull llama3Now you may simply start with
ollama run llama3which provides you already with an command line text interface to your newly created AI. To make further progress in this setup the Ollama service should run in the backend and simply be available. Start the service with
ollama serve on the console which gives you for the start an impression on what actually happens in the backend.

You as well may provide multiple models which all can be installed with the ollama pull command. The library website shows how many there are and describes their scopes and origins – whether you trust them or not.
The models installed can be reviewed with the command
ollama list Beyond that, with a service in the backend and perhaps providing an platform for multiple users you can check the models currently running with
ollama psThis should be empty without a current running session.
You on top may be able to access your windows web-browser and try http://localhost:11434 and you should get a nice “Ollama is running” – asuming you have not yet changed ports.
Web Front End OPEN Web Ui
to provide convenient access we should install a even more convenient web access frontend with OPEN WebUI. Since docker was prepared already during system preparation a simple
sudo docker run -d --network=host -v open-webui:/app/backend/data -e OLLAMA_BASE_URL=http://127.0.0.1:11434 --name open-webui --restart always ghcr.io/open-webui/open-webui:mainshould do the trick. Just in case, make sure the docker daemon is running – or check the status
sudo /etc/init.d/docker start
orsudo systemctl start docker
Open locally http://localhost:8080 and you should have access to the WebUI already talking to Ollama. The first user you register (link below the authentication dialog) will be the first admin.
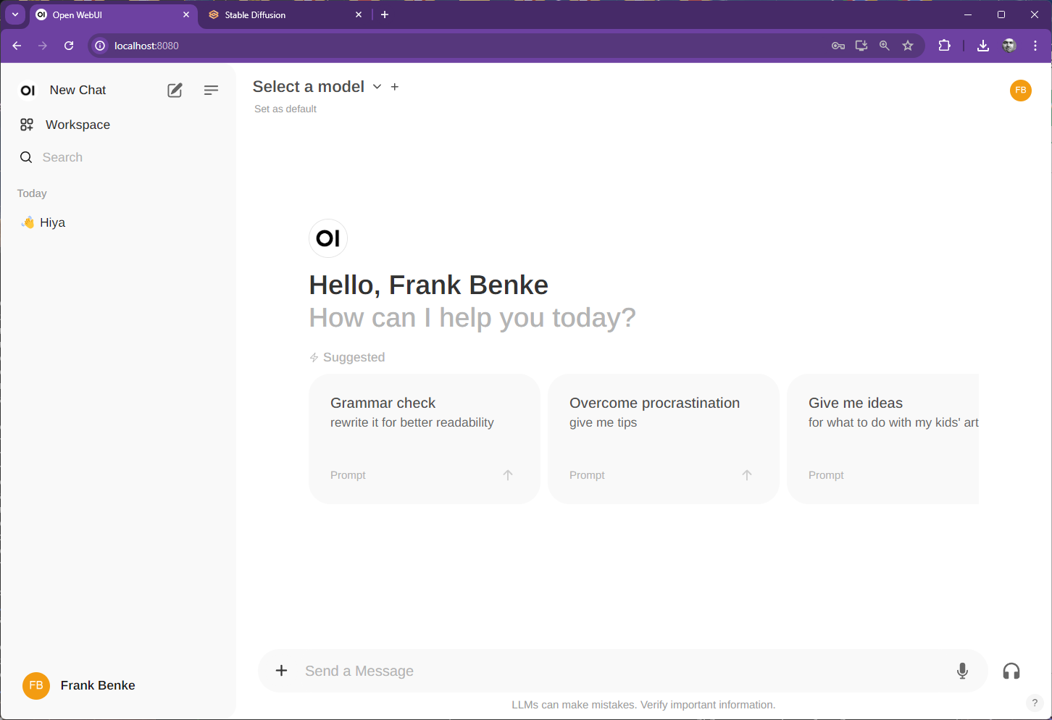
Introduction into the utilization of the WebUI is not scope of this document, nevertheless essential. Give it a simple try with an recommended llama3

Reverse Proxy
If you access your environment locally, e.g. WSL youre done here – since the Ollama and the WebUI only answer locally. Docker –network=host indicates this and docker-compose took care of the effort.
Nevertheless if you need additional or external access, partially if it is installed in an backend server system and you don’t want to change the reachability rules for the Interface you need an additional reverse proxy, which we skip here. Apache2 and nginx are both feasible and of the shelf solutions where nginx is recommended for the performance considerations when dealing with larger document sets.
Image Generation
Now we may install a local image generating AI with Stable Diffusion on top to interact with WebUI and the underlying language models. Along with that comes an Interface integration called AUTOMATIC1111.
Therefore create and enter a Python virtual environment for use with Stable Diffusion. Assuming we create within the home directory a project environment:
cd ~
mkdir $HOME/projects
mkdir $HOME/projects/stable_diffusion
cd  $HOME/projects/stable_diffusion
Then install a python virtual environment
sudo curl https://pyenv.run | bashTo initialize Python virtual environments for your task you then should the necessary parameters to your .bashrc_profile – asuming you use bash.
If this does not result in an running environment (due to distribution restrictions) go for the complete reinstall
git clone https://github.com/pyenv/pyenv.git ~/.pyenv
git clone https://github.com/pyenv/pyenv-virtualenv.git $(pyenv root)/plugins/pyenv-virtualenv
export PYENV_ROOT="$HOME/.pyenv"
[[ -d $PYENV_ROOT/bin ]] && export PATH="$PYENV_ROOT/bin:$PATH"
eval "$(pyenv init -)"and make shure your bash comes with the environment set
source ~/.bashrc_profileNow activate your Python virtual environment and bring it to the according level
pyenv install 3.10
pyenv global 3.10
Make sure you are still in the before mentioned working directory and get the installation script
wget -q https://raw.githubusercontent.com/AUTOMATIC1111/stable-diffusion-webui/master/webui.shAccording to recent installations you now should first activate the virtual environment and install within this scope
source ./bin/activate
pip install --upgrade pip
pip install xformers
change the permissions on the Web UI install script and start it
chmod +x webui.sh
./webui.sh
This may take a while and as far as I know all prerequisites that had not been met by default are added within this guide. Nevertheless I found the error messages very speaking and the stable diffusion now should be available in http://localhost:7860/
This Webinterface is first self contained and you may start generating pictures.
To allow the further integration you then need to start the service with the API tokens e.g.:
./webui.sh --api --api-auth frank:frankFurther Integration
Further integration is now commenced in the admin panel of Open WebUI.
Under settings, subpanel images the stable diffusion link should be noted in AUTOMATIC1111 Base URL. as mentioned before. This mean fill in the above link for base URL and frank:frank for the API token and check the connection. This should give a green prompt.

Now you have to select the image model and may change the sice and sample default values, but with the save your OPEN WebUI is integrated with stable diffusion.
After reloading your browser tab under the chat contexts is now an image Icon that may be used for further interaction and you can even ask the language model to write an prompt for image generation.

After this point you can start digging into using this environment and explore it. This includes customizing the pretrained models by training them with your private data – which in this case will not get uploaded to any spooky internet site.
As an outlook after utilizing this we may even add the promised chatbots, add RAG (retrieved augmented generation) and document databases such as couch DB.
So kyp. F.